Troubleshooting
Pag-tugon sa suliranin at Pag-troubleshoot
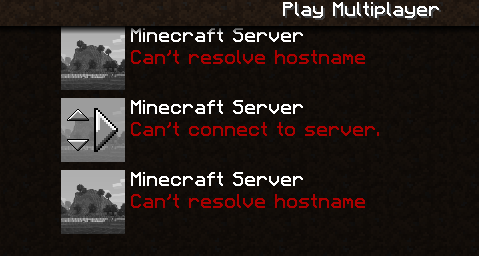
"Cannot Resolve Hostname"
Technical issues are the most commonly seen defects that would have stopped our players from connecting to our service. Constant disconnections and insanely high latency could be possibly caused by several incorrectly configured settings from the client-side or even from the network-side. We have, therefore, provided some quick solutions here attempting to tackle these commonly seen network issues in Minecraft. In this section, we are together trying to solve one of the most frequently reported issues: "Cannot Solve Hostname", through the method of successive exclusion.
Step 1: Checking connections
You shall start by testing your connections to our alternative gateways in Singapore and Malaysia to see if the problem persists. Conduct connection tests with our domain names (Text IPs) first before heading to solve the problem by using our numeric IP. You are only recommended to use our alternative IPs when you are having troubles connecting through our main gateway "play.battleasya.com". If, unfortunately, the aforementioned method could not resolve your problems, please proceed to the next step.
Step 2: Clearing DNS cache
In case of further failure, you may want to try clearing DNS cache from your system to see whether the problem is client-side or not. A full guide can be found here. If, unfortunately, the aforementioned method could not resolve your problems, please proceed to the next step.
Quick Guide (For Windows 10)
Step 3: Changing DNS service
If you have the administration rights to enter to the control panel of the wireless router you are connected to, you shall resort to the method of switching DNS services. A full guide can be found here. We do recommend using Google Public DNS or Cloudflare Public DNS as your custom DNS service instead of the default one provided by your ISP. Should you have any further concerns or difficulties, please feel free to contact us here.
Click here for a Detailed Guide with pictures showing how to change your DNS service in Windows 10.
Alternatives:
If you are able to gain access to your router and to enter the control panel, you may modify your DNS settings locally in your computer within a few easy steps. Follow the instructions from the following website: https://www.windowscentral.com/how-change-your-pcs-dns-settings-windows-10. It is highly recommended that you will choose either the Google Public DNS or the Cloudflare Public DNS.
Step 1: Checking connections
You shall start by testing your connections to our alternative gateways in Singapore and Malaysia to see if the problem persists. Conduct connection tests with our domain names (Text IPs) first before heading to solve the problem by using our numeric IP. You are only recommended to use our alternative IPs when you are having troubles connecting through our main gateway "play.battleasya.com". If, unfortunately, the aforementioned method could not resolve your problems, please proceed to the next step.
- Official Gateway - Singapore: play.battleasya.com
- Alternative Gateway - Singapore: sg.battleasya.com
- Alternative Gateway - Malaysia: my.battleasya.com
- Numeric IP solution - Singapore: 139.99.114.15:30010
Step 2: Clearing DNS cache
In case of further failure, you may want to try clearing DNS cache from your system to see whether the problem is client-side or not. A full guide can be found here. If, unfortunately, the aforementioned method could not resolve your problems, please proceed to the next step.
Quick Guide (For Windows 10)
- Click Search.
- Enter cmd in the search text box.
- Right-click Command Prompt and select Run as Administrator.
- Run the following command: ipconfig /flushdns
- If the command succeeds, the system returns the following message:
Windows IP configuration successfully flushed the DNS Resolver Cache.
Step 3: Changing DNS service
If you have the administration rights to enter to the control panel of the wireless router you are connected to, you shall resort to the method of switching DNS services. A full guide can be found here. We do recommend using Google Public DNS or Cloudflare Public DNS as your custom DNS service instead of the default one provided by your ISP. Should you have any further concerns or difficulties, please feel free to contact us here.
Click here for a Detailed Guide with pictures showing how to change your DNS service in Windows 10.
- Google Public DNS
Primary DNS address: 8.8.8.8
Secondary DNS address: 8.8.4.4 - Cloudflare Public DNS
Primary DNS address: 1.1.1.1
Secondary DNS address: 1.0.0.1
Alternatives:
If you are able to gain access to your router and to enter the control panel, you may modify your DNS settings locally in your computer within a few easy steps. Follow the instructions from the following website: https://www.windowscentral.com/how-change-your-pcs-dns-settings-windows-10. It is highly recommended that you will choose either the Google Public DNS or the Cloudflare Public DNS.
We deliver quality services through a clean, trusted, respectable and fulfilled workforce.


